
Welcome to the digital era, where managing our online activities and safeguarding ourselves from distractions and inappropriate content has become crucial. Whether you’re a vigilant parent or an individual seeking better focus, knowing how to block websites on iPhone can be a game-changer.
In this blog post, we’ll walk you through various methods to effortlessly block websites on iPhones running iOS 12 and above, as well as older versions.
1. How to Block Websites on iPhone – iOS 12 and Up:
Apple’s iOS 12 brought some nifty content-blocking features to the table, making it easier than ever to control website access. Even though, here’s your simple recipe for blocking websites on iPhones running iOS 12 and above:
- Step 1. Anyway, open the “Settings” app on your iPhone—easy peasy!
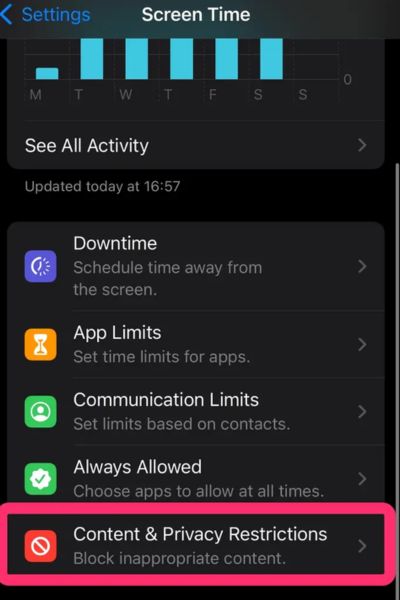
- Step 2. Now scroll down and tap on “Screen Time” like a pro.
- Step 3. Aha! Select “Content & Privacy Restrictions” to unlock the magic.
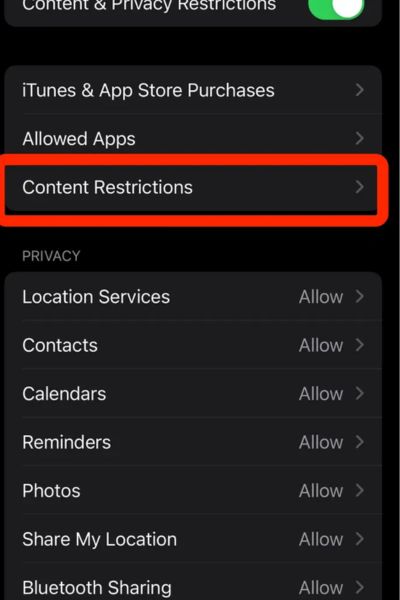
- Step 4. Furthermore, enable the “Content & Privacy Restrictions” toggle if it’s not already on—let’s get this party started!

- Step 5. Tap on “Content Restrictions,” and then select “Web Content”—we’re getting closer!
- Step 6. Select “Limit Adult Websites” to let your iPhone handle blocking adult content on its own. Let’s keep things safe and sound!
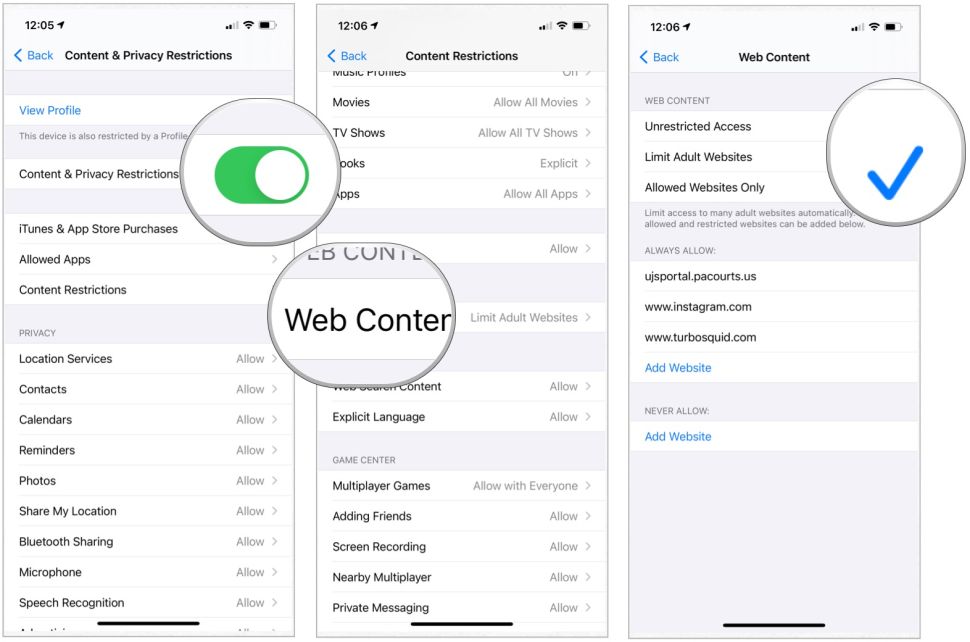
- Step 7. Moreover, for an extra layer of control, tap on “Add Website” under “Never Allow” to personally blacklist specific websites that you want to block. Even though, it’s like waving a digital “No entry” sign!

Also Read: How to disable popup blocker
2. How to Block Websites on iPhone – iOS 8 Through iOS 11:
If your iPhone is running on iOS 8 through iOS 11, worry not! Even though, here’s how you can block websites with a sprinkle of magic:
- Step 1. Launch the “Settings” app on your iPhone. You’re doing great!
- Step 2. Further, tap on “General” and select “Restrictions” like a pro sleuth.
- Step 3. Moreover, if Restrictions are disabled, tap on “Enable Restrictions” and set a secret passcode—shh, it’s our little secret!
- Step 4. Now, scroll down and select “Websites” with confidence—let’s dive into the website-blocking adventure!
- Step 5. However, under “Allowed Websites,” choose “Limit Adult Content” to let your iPhone automatically block adult websites. Safety first!
- Step 6. Need more control? Additionaly, tap on “Add a Website” under “Never Allow” to manually add websites that you want to wave goodbye to. It’s your chance to take charge!
Related Topic: How to clear cookies on iPhone
3. Set Up Approved Sites:
Sometimes, it’s better to go with a “less is more” approach. Instead of blocking everything, let’s focus on allowing only specific websites. Although, here’s how you do it:
- 1st Step. Open the “Settings” app on your iPhone—ready for some advanced ninja moves?
- 2nd Step. Furthermore, navigate to “Screen Time” and tap on “Content & Privacy Restrictions.” You’re unlocking a world of possibilities!
- 3rd Step. Although, enable the “Content & Privacy Restrictions” toggle if it’s not already on—power up!
- 4th Step. Moreover, tap on “Content Restrictions,” and select “Web Content” like a champ.
- 5th Step. Choose “Allowed Websites Only” to become the gatekeeper of your digital kingdom. You’re in control now!
- 6th Step. Now, tap on “Add Website” under “Always Allow” to add the websites you want to give a VIP pass to—because not all websites are created equal!
Also Read: How to disable private browsing on iPhone
4. Remove Sites From the Approved List:
Oops, change of plans? Whether you’ve added websites to the approved list and want to revoke their access, it’s a piece of cake. Though, here’s how:
- Step 1. Firtly, go to the “Settings” app on your iPhone—time to undo what’s been done!
- Step 2. However, access “Screen Time” and tap on “Content & Privacy Restrictions.” You’re a pro at this by now!

- Step 3. Further, enable the “Content & Privacy Restrictions” toggle if it’s not already on—let’s get back on track!
- Step 4. Also, tap on “Content Restrictions” and select “Web Content” once again.
- Step 5. Choose “Allowed Websites Only”—we’re still in charge!
- Step 6. Further, tap on the red minus (-) button next to the website you want to remove from the approved list. And just like that, they’re out!
Read Also: How to factory reset iPhone 6 and later versions
Other Content Blocking Options:
Feeling extra adventurous? Even so, there are additional content-blocking options available on the App Store. Although, these apps offer advanced website-blocking features, time restrictions, and enhanced parental controls. However, here are some popular ones to explore:
- Freedom: For the freedom-seeking souls!
- Focus: Because the focus is your middle name!
- Norton Family: When you need a digital guardian angel!
- Bark: A friendly watchdog for your online world!
- Net Nanny: Keeping it safe and secure, always!
Conclusion:
Finally, you’re now a pro at blocking websites on your iPhone! By following the easy steps outlined in this guide, you can effortlessly take control of your online experience, enjoy better focus, and create a safe digital environment for yourself or your loved ones. So go ahead, master the art of website blocking, and unlock a world of productivity and digital well-being on your iPhone.
Frequently Asked Questions:
A: Absolutely! iOS has your back with its built-in features to block websites without any extra apps.
A: Of course! iOS Screen Time allows you to set time limits for website access, giving you the flexibility to manage your online activities.
A: You bet! Even you’re using the same Apple ID and iCloud account on multiple devices, your website blocking settings will sync automatically. It’s like magic!